Feeds:
Posts
Comments

Archive for the ‘food’ Category

Happy Easter!

decorate-easter-cookies

I wish I could claim responsibility for this one!

I wish I could claim responsibility for this one!

octopus-easter-cookie

Definitely the boyfriend's work

Definitely the boyfriend's work

And, as a special Easter bonus, cute dogs getting excited about Easter cookie decorating! Or, really, excited about the boyfriend’s hands:

cute-dogs-playing

Hope everyone had a good weekend. I myself love any holiday that mandates brunch AND decorating food.

Read Full Post »

I’ve been reminded the past few weeks why Spring may be my favorite season, and I need only one word for it: asparagus.

I’ve been pining or asparagus season since, oh, November or so. Granted, this is California, so I could theoretically get asparagus anytime I want, but it’s usually conventionally grown and from Mexico or Chile. With a vegetable that’s technically a young shoot and is best when it’s fresh, there’s no way this stuff is going to cut it.

When I spied local, fresh asparagus at my farmers’ market three weeks ago, my jaw literally dropped. I’ve been buying a pound of it every week since, which I usually consume singlehandedly in two sittings.

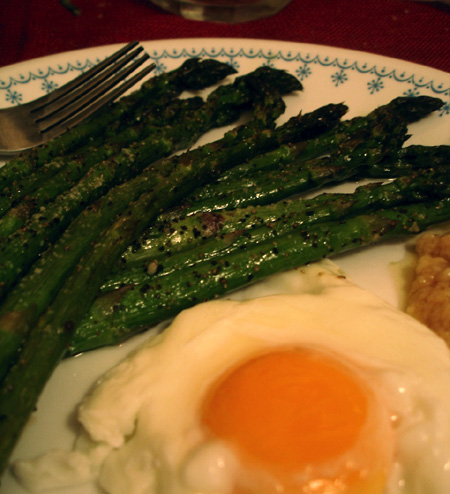
roast-asparagus

The above is one of my more successful asparagus endeavors: roast asparagus (with salt and pepper), a poached egg, and a miso butter sauce on the side. Dipping the asparagus in the egg yolk was great, and the miso butter — get this vegans — tasted exactly like parmesan cheese. As one who’s been eschewing dairy lately, this discovery made my evening. (Miso butter recipe here, I used margarine: http://www.nytimes.com/2006/04/19/dining/193crex.html)

However, pan-roasting asparagus turned out to be the best option. Even better than roasting. I made a giant plate of it for me and my sweetie; prep was little more than cutting the asparagus spears into bite-ish-sized piece and sauteeing in olive oil over medium-high heat for five minutes, then cutting the heat to low for the last five. Sprinkle with some salt and pepper, and you have a meal fit for a king. Or queen. Or whatever royalty you want to be.

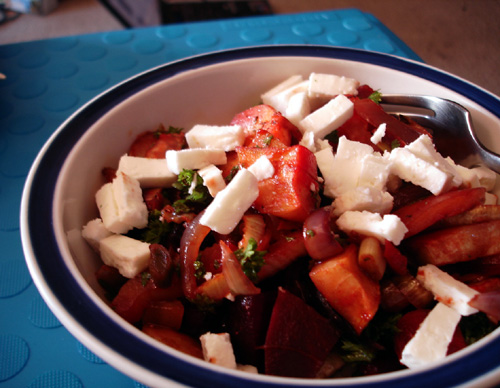
We’ve also started enjoying our CSA share — our second pick-up is tomorrow. Our CSA seems to favor a really wide variety of vegetables. Last week, it was parsnips, which I’d never had. We discovered that we really like parsnips. Veggie prep this week has been roasting them — a mix of a parsnip, some carrots, a beet, red onion, some fennel root, coated with olive oil and put in a pan with about a cup of veggie broth. Roasty at 350F for an hour; dress with mixture of (2 T soy sauce + 1 T balsamic vinegar), salt, pepper, some cayenne, fresh herbs (we had parsley). We found feta to be a nice addition as well. Also good with brown rice. Pretty much any root veggies would do well in this way of preparing, which I found in my CSA cookbook. Note to veggie lovers out there: CSA cookbooks are great, if you can get your hands on them.

roasted-root-vegetables

Here’s to Spring and all of the adventures it brings.

Read Full Post »

So, we’ve already seen How to Crochet a Hamburger Bun. Now, I take you to Part II of this endeavor: How to Crochet Lettuce, and How to Crochet a Slice of Cheese. One is significantly easier than the other.

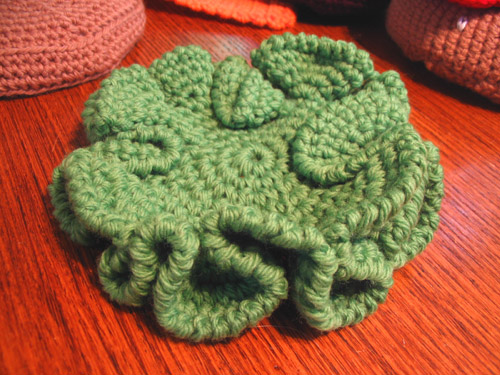
How to Crochet a Piece of Lettuce

crochet-lettuce-ruffle
Begin crocheting a circle, as in How to Crochet a Hamburger Bun.
– Perform increase rows until there are 4 sc between each increase st.
– Begin hyperbolic plane crochet: 2 sc into each st around
– Your circle will quickly begin to fold on itself. I wish I could tell you how many of these crazy increase rounds I worked, but I can’t — just keep on a-doin’ them until your lettuce is of sufficient size. 2sc in each st, around and around.
– For fun lettuce-y edging, you will do a crab stitch. To do this: everything is as in normal sc, EXCEPT that you will be moving left to right. So, you know how when you normally crochet you insert your hook into the st to the left of what you just completed? Instead, insert it into the st to the right of the one you just completed, and perform the st as normal. It’s funny and backwards (hence “crab st”), but will give you a little more texture on the outside of your lettuce. Work this all the way around.
– Fasten off. Admire your synthetic photosynthetic creation.

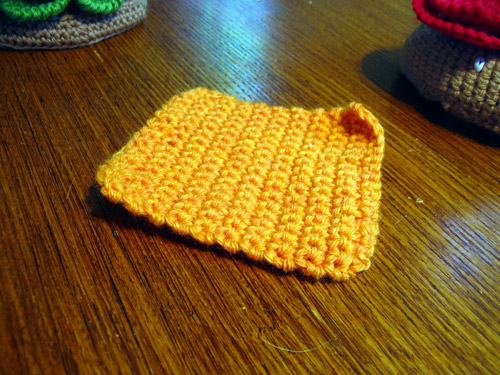
How to Crochet a Slice of Cheese

crochet-cheese-cheezburger
– Ch 17, plus one for turning st.
– Sc across. Perform turning ch if you wish. I rarely do.
– Sc back and forth until you have a square. Fasten off.
– This will curl at the edges, as sc is wont to do. That’s cool. It makes the cheese look melty.

Tomorrow, the cheezburger saga will conclude with Part III: How to Crochet a Cheezburger Patty and How to Crochet a Slice of Tomato. Some assembly required.

Read Full Post »

Being a Lolcat for Halloween was really fun. Some people had no idea what I was, to which I replied, “Well, it’s this internet phenomenon… pictures of weird cats with silly captions… cats like cheezburgers…” and received questioning stares. But! Those who recognized my costume were really stoked.

Regardless, everyone loved the crochet cheezburger. That’s right. I crocheted a cheezburger for my Halloween costume.

Needless to say, this was a test of my crochet skills. Also of my stamina, as I was up until 2 in the morning the night before Halloween. I chose to crochet my cheezburger instead of knitting it because crochet offers more possibilities as a structural element — while knitting offers better drape for garments, I think, crochet is great for constructing an object because each stitch is a little bit like a Lego. Crocheted fabric is also stiffer, which means it holds up well in a toy.

All the yarn used for this was Cascade 220, my absolute favorite yarn. The yarn’s cheap, comes in a wide variety of colors, and is an all-around great yarn to work with. Also, I always have many colors of it in my stash.

So, today, I’ll post on how to crochet the top and bottom hamburger buns for the cheezburger (the correct kitteh spelling of “cheeseburger”). Tomorrow, I’ll fill you in on how to crochet the lettuce, cheez/cheese, patty, and tomatoes.

Here goes!

Top Hamburger (or Cheeseburger or Cheezburger) Bun

Piece 1 of Top Bun:
– Ch 3.
– Sl st to first chain to create a small circle.
– 8 sc into 3-ch circle. 8 st.
Increase: 2 sc in each sc around – 16 st.
– *2 sc in one sc, sc* around (you are increasing every other st) – 24 st.
– *2 sc in one sc, sc, sc* around (you are increasing every third st) – 32 st.
– Continue in set pattern, increasing 8 stitches every round, increasing the number of sc between each inc st until there are 6 st between each of your inc stitches – 64 st.
— To clarify, the last inc round you do will be *2 sc in one sc, sc 6x* around
– Work 4 round even
– Fasten off.
Piece 2 of Top Bun:
Same as for Piece 1, but do not work even rounds. Fasten off after last inc round.
Finishing the Top Bun:
– Embroider sesame seeds on larger part of bun using broken chain st (AKA lazy daisy st).
– Whipstitch top and bottom pieces of top bun together, leaving a small hole at the end through which to stuff — I used cotton balls!
– Pretend to eat your new bun.

Bottom Hamburger (Cheeseburger, Cheezburger) Bun


Proceed as though making Piece 2 of Top Bun.
– After finishing last inc round, do not fasten off; instead, work one round even but through the back loop only. This will give you a little bit of a turning row.
– Work 3 rounds even.
– At this point, cut out a circle of cardboard that is slightly smaller than the base of your cheezburger bun. This wil stabilize the bottom.
– Begin working decrease rows; on the first row, again work through back loops only.
Decrease: *(Insert needle into next st and pull through a loop that stays on your hook, repeat into following st giving you three loops on your hook; finish sc by pulling a loop through all three loops on hook, thereby decreasing one st but not leaving a hole in your work), sc 6x* around
– Continue to decease with one less sc b/t dec sts. When you are getting smaller, put cardboard in bottom. Continue to decrease until you have a very small hole — stuff the bottom bun at this point. Do final decreases until you are down to as few sts as comfortable.
Note: Pull yarn tight during these steps, as it will be a little bit of a struggle to decrease the circumference this quickly.
– Use crochet hook to close up final hole — this does not need to be neat, as it will be hidden inside your cheezburger.

Success!

Weave in all ends and pat yourself on the back. Begin to get excited about cheezburger fixin’s.

Read Full Post »

Taking Back the Plate: A Manifesto in Favor of Playing With Food

I come to you tonight, my friends, with a proposition: play with your food. There are a number of reasons why I urge you to play with your food, beyond the fact that it is really fun.

It seems as though any kind of conscientious eating — like being vegan or vegetarian, or eating locally — can seem like a heavy task. It’s easy to get caught up in what is or is not vegan/vegetarian/local/la la la, and eating becomes a drag. I know a few vegans whose relationship with food seems to be a perpetual struggle or their cross to bear — they bemoan everything they can’t eat, and their focus on what is not vegan usually plays out as them being really condescending towards others who are not as detail-oriented or who choose to eat differently. I say to you: is this enjoying your food?

Resolution: In the face of a society that spends as little time and money as possible on their food: take back your plate! rediscover the fun of eating! play with your food!

Ok, silly proclamations aside, here’s what’s up:
I’ve started trying to cultivate this playful method of interacting with my food. My experience with vegan cooking, at its best, has been all about this fun approach to food. It’s kind of like, “Wow, these beets are really pretty. How do I want to play with that?” Or something like, “Hmmm, I know I like avocado on toast, and I know I like nutritional yeast on toast. What if I did them both at the same time??!” I’d say the best thing to come out of my vegan kitchen was the advent of Yam Cornbread. More on that later…

Sadly, at its worst, it was all about not being able to make anything because I didn’t have the right ingredients, or hours of time, and oh my god what kind of sugar will not make me a bad vegan? Thinking about those times now, I feel like this: eating is nourishing. Eating should be an act of giving to your body, of taking time to make something and sit down and enjoy the act of eating. It should not be an act of penance or sacrifice or boredom. And yes, I have nights where I want the easiest thing possible. I’d argue on those nights it’s more fun to get some Amy’s Mac n Soy Cheeze, instead of laboring for something my heart isn’t really in.

Some of this is motivated by feeling weighed down by Vegan MoFo in the face of starting a new job. The truth is (don’t judge me!): I’m not vegan… I was, and I’m not anymore, but I see great merit in meals that leave out the meat and dairy. Most of my cookbooks are vegan for precisely that reason: so I can make a vegetable, and eat a vegetable, instead of a bunch of cheese with a tiny bit of crappy broccoli. But, you know, after a day of cramming lots of knowledge into every little place in my skull, the idea of coming home and trying to cook impressive vegan food seems daunting; coupling that with photographing and blogging definitely intimidates me.

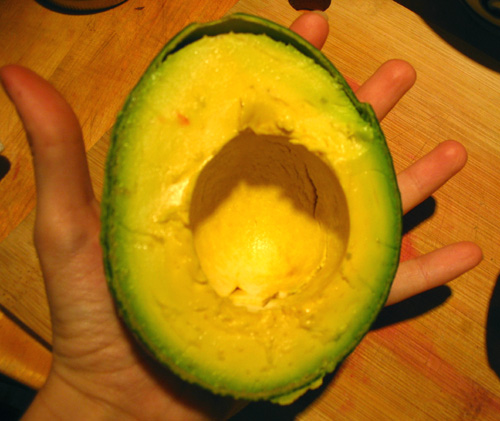
And then I remember, wait, food is awesome. Food is totally fun. And hell yes I’m allowed to arrange it in pretty ways before I cook it — and make something easy (roasted vegetables), but make it work for me by eating it with a GIANT AVOCADO:

Are you getting how big this is? Now THAT is an avocado.

I guess in all of this I’m giving myself permission to have fun with the food preparation and eating process. I want to encourage you, too, towards that — especially a few days away from the end of Vegan MoFo and heading into Halloween and Thanksgiving (US)!

Go forth and play with your food. Now.

Read Full Post »

Starting my new job today (!!!), so a quick post full of quick vegan noms.

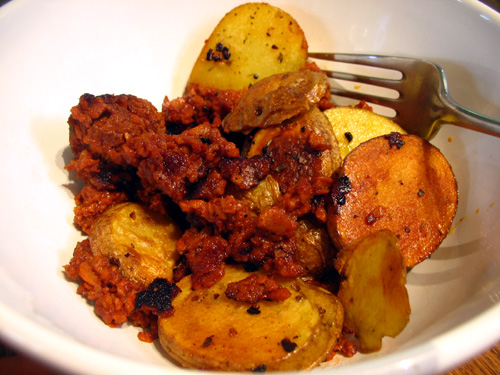
Fast and easy vegan breakfast, take 3-ish:

How to: Fry up some potatoes in olive oil. After flipping (once brown on one side), add soyrizo. Fry a little more. Nom. Swoon.

Quick vegan dinner in October:

Souuuuuup. Minestrone soup. Ok, ready? Set?
– Pan. Olive oil. Onions + garlic. Saute (no burning!) until slightly wiggly.
– Add carrots, celery, potatoes, other harder veggies of your choosing. Saute a little more.
– Add pasta, chopped kale/cabbage, small can of crushed tomatoes (with liquid), veggie stock to more than cover. Also add salt, pepper, Italian seasoning. Simmer for a while — until pasta is cooked.
– Again, nom.

Easy like… something that’s really easy, like… slipping on a banana peel. Or, considering I’ve never done that, someting easier. Like sleeping in on the weekend. Only tastier.

Read Full Post »

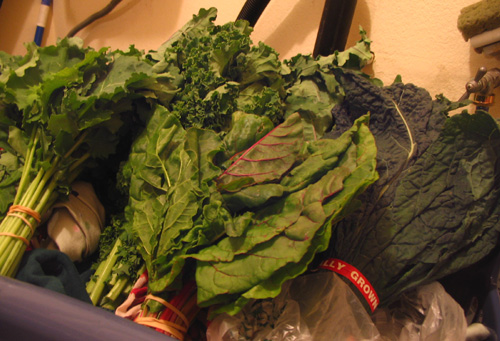
I’m drowning in greens. No, seriously.

I might be keeping them in my laundry room. There's no more room in the fridge!

I might be keeping them in my laundry room. There's no more room in the fridge!

I came home with a LOT of greens from the farmers’ market. I already had some beet greens and one bunch of golden chard (I couldn’t resist, and it was one dollar). Then at the market on Saturday I bought two bunches of kale (russian and some other kind) and two bunches of rainbow chard, all from a vendor who has the smallest most tender greens. But then my partner in crime at the stand told me to see another farmer down the way for greens as the market was closing. He gave me six bunches of greens — four kale (one curly, two lactino, one russian purple), and two rainbow chard. That’s a total of ten bunches of greens.

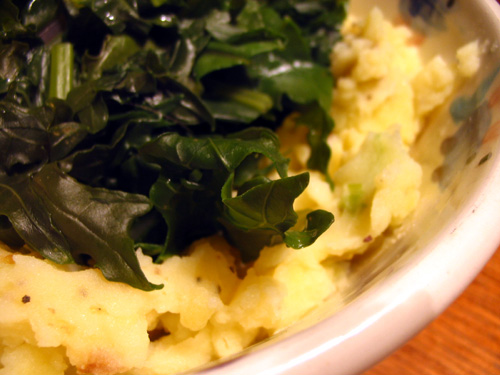
Naturally, I’m looking for a way to get through them. Some of the daintier chard became a breakfasty thing yesterday morning. One beautiful bundle of the smaller-leafed kale was destined last night for colcannon. Colcannon, I learned today, is a traditional Irish dish (some say the traditional Irish dish), meant for serving on Halloween. How appropriate! It is made with a combination of potatoes, onion or leeks, and cabbage or kale. Differing sources will tell you that cabbage or kale are the more correct green. Considering that kale is a relative of cabbage, I say it’s all good.

Here’s how I made colcannon — a delicious, healthy comfort food.

You need:
– Potatoes (I used one big one and four little ones), chopped into 1″ cubes
– One medium leek, cut into 1/2″ pieces
– One bunch kale, stems trimmed and cut into 1″ strips
– Milk of your choice, 1/2 – 1 cup
– Margarine or butter-like substance of your choice
– Salt and pepper

Start by boiling the potatoes in salted water. These take the longest. Then move on to the leeks (wash well!), which are sauteed in olive oil on medium heat until soft. The kale gets cooked (see how to cook kale) — do this last, as greens get cool very quickly and only take 5-7 minutes.

Once potatoes are fork-pierceable, drain water and transfer to bowl. Add leeks and 1/2 – 1 cup of milk. Mash. I like some chunks in there (and I leave the potato skins on anyway). Season liberally with salt and pepper. Create a crater, into which you put the (drained) kale. Top with a pat of butter-like substance. Curl up and carb out.

This is dirt-cheap and takes under an hour. Making kale tonight illustrated to me what a difference good produce makes in meal preparation — the kale I got was made of very young leaves, which cooked quickly and were tender and not bitter at all. If you’re looking for how to cook kale to make it taste good and so that it isn’t bitter, get ye to a farmers’ market! Get good kale! Your efforts will be rewarded.

Also, a reminder of why we wash our vegetables:

Go forth and celebrate the coming of Halloween with some colcannon!

Read Full Post »
Dinner last night was very pretty. Witness:

I decided to roast some vegetables in the oven. What you see is a mix of:
– Brussels sprouts
– Torpedo onion
– Carrots
– Red and gold beets
– Sweet potatoes (white and orange-ish)

Roasting vegetables is so easy and really quick! All you need to know about how to roast vegetables is:
– Cut them into roughly even pieces for even cooking. Sturdier things (like beets) can be a little smaller so they’ll cook more quickly.
– Coat liberally with olive oil. According to Alton Brown, this keeps moisture in the veggies and helps them not burn.
– Season as desired (salt, pepper, whatever) and toss in the oven for about 40 minutes at 400 degrees Fahrenheit. Veggies are done when easily pierced with a fork.

In addition to being pretty and rainbow-colored, oven roasted vegetables are also delicious. As the boy said last night, “How are mine already gone? I tried to eat them slowly!”

We also had artichokes with dinner. I love artichokes and should have been eating more while they’re in season! Each of them was a buck a piece at the farmers’ market. Soooooo good.

How to cook/make artichokes:
– Trip 1/2″ off top and pointy things with scissors
– Trim stem
– Toss in a pot of boiling water for 30-40 minutes. Done when bottom is easily pierced with fork.

These are good with melted margarine/butter, but also with some soy sauce and/or lemon juice. I think artichokes might be my favorite food.

Go forth and eat vegetables!

Read Full Post »

Phew! So I made granola a few days ago. Every recipe I found was “oats, nuts, seeds, la la la mix of oil and sugar and toasty-toast!”

It came out alright. No clumping action though — I think next time I need more oil/sugar. I used brown sugar in the interest of making it vegan. I may try honey next time. The flavor’s really good. Just unfortunate that the coconut smell (I used coconut oil) gave me a migraine.

Also, I introduce my new favorite way of eating: bowl. In a bowl. I made a bunch of quinoa last night and some of the perfect tofu. My new plan is to (on the weekend from now on) make a bunch of grains and tofu and sauces on the weekend. Then, during the week, toss a mix of it in a bowl with some freshly cooked veggies and greens. Instant meal! No boredom! Yay!

Man I love quinoa. Super fast cooking and awesome source of protein. I made a mix of white and red quinoa last night. I just throw a bunch of it in a pot with a massive amount of water and boil it like pasta. When it tastes/feels done, I drain the water. It’s just that easy.

So last night was quinoa, tofu, chard, some red onions, and tahini sauce. Yummers! It was a nice sturdy meal and made me feel like I was getting a lot of protein.

Grains for the future: brown rice, more quinoa, teff (never had it), millet maybe? I’m trying to branch out with my grains. Also, try my hand at polenta.
Protein for the future: tofu made different ways, chickpeas, other beans…
Sauces for the future: miso-tahini, peanut, Caesar

I’d love recommendations for bowl eating!

Now to the non-vegan portion of this post. I made yogurt! I’d like to try it with soy in the future, but I got a little freaked out by the requirement of agar. I used whole milk from a local dairy (135 miles away). The dairy actually seems really cool and ethical: Straus Family Creamery.

I made the shift away from vegan a few years ago, out of health/time issues. Lately my food priorities have been with local food — I feel better about consuming small amounts of conscientious dairy that comes locally, instead of the processed corn/soy fake meat I was eating. Anyway! Sometimes I feel like I still have to justify not being vegan anymore.

So! I made yogurt. It turned out pretty awesome, and it was really easy. It was mostly a lot of passive time letting it incubate.

I really encourage you to try making your own yogurt. I made 2 pints of yogurt, which was $2.50 worth of milk. The milk came in a glass jar that the dairy takes back, and I made the yogurt in glass jars, so no plastic containers. Probably the cheapest most eco-friendly yogurt possible!

These are some great links I found for yogurt-related fun:
Making Your Own Yogurt
Yogurt on 101 Cookbooks
A cool-looking yogurt-based restaurant in Palo Alto

Read Full Post »

My breakfast this morning was about as healthful — and delicious — as it gets. I bet I got two servings of fruit and two servings of whole grains. I just can’t get over oatmeal!

In my previous life at a desk job, I ate oatmeal every weekday. I had my little pint-sized Mason jar that I’d keep at my desk and a bag of thick rolled oats in the desk drawer. Every day it was two-thirds of a jar of oats, some turbinado sugar, and enough hot water just to cover it. Put the cap on, let sit for a few minutes, et voila! Chewy, warm, tasty oatmeal.

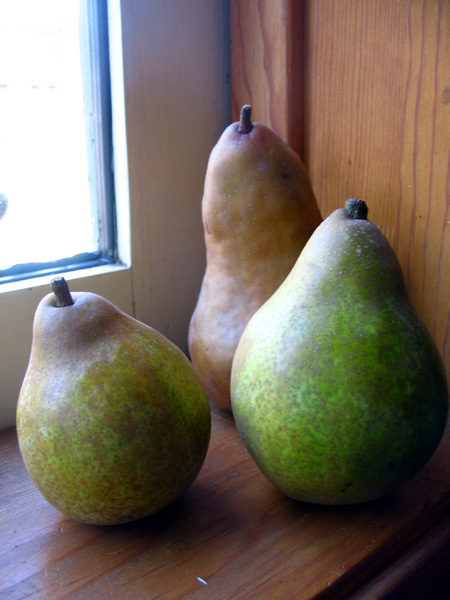
Oatmeal still serves me as perhaps the quickest, easiest breakfast I can muster. I’ve also been stirring in a spoonful of yogurt lately, for extra creaminess and probiotic action. Today, though, was special. I added a chopped-up pear, and things went to another level. These pears from the farmers’ market are SO sweet and the perfect texture. And what a good, easy way to kick up oatmeal! I bet it would be easy enough to chop them up the night before and take them in a plastic container, then add them at work. Yummers.

In conclusion: Dear pears, I love you.

Read Full Post »

Older Posts »