Feeds:
Posts
Comments

Posts Tagged ‘vegetarian’

I’ve been reminded the past few weeks why Spring may be my favorite season, and I need only one word for it: asparagus.

I’ve been pining or asparagus season since, oh, November or so. Granted, this is California, so I could theoretically get asparagus anytime I want, but it’s usually conventionally grown and from Mexico or Chile. With a vegetable that’s technically a young shoot and is best when it’s fresh, there’s no way this stuff is going to cut it.

When I spied local, fresh asparagus at my farmers’ market three weeks ago, my jaw literally dropped. I’ve been buying a pound of it every week since, which I usually consume singlehandedly in two sittings.
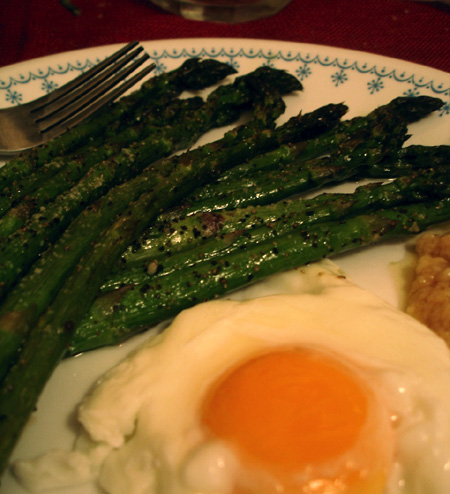
roast-asparagus

The above is one of my more successful asparagus endeavors: roast asparagus (with salt and pepper), a poached egg, and a miso butter sauce on the side. Dipping the asparagus in the egg yolk was great, and the miso butter — get this vegans — tasted exactly like parmesan cheese. As one who’s been eschewing dairy lately, this discovery made my evening. (Miso butter recipe here, I used margarine: http://www.nytimes.com/2006/04/19/dining/193crex.html)

However, pan-roasting asparagus turned out to be the best option. Even better than roasting. I made a giant plate of it for me and my sweetie; prep was little more than cutting the asparagus spears into bite-ish-sized piece and sauteeing in olive oil over medium-high heat for five minutes, then cutting the heat to low for the last five. Sprinkle with some salt and pepper, and you have a meal fit for a king. Or queen. Or whatever royalty you want to be.

We’ve also started enjoying our CSA share — our second pick-up is tomorrow. Our CSA seems to favor a really wide variety of vegetables. Last week, it was parsnips, which I’d never had. We discovered that we really like parsnips. Veggie prep this week has been roasting them — a mix of a parsnip, some carrots, a beet, red onion, some fennel root, coated with olive oil and put in a pan with about a cup of veggie broth. Roasty at 350F for an hour; dress with mixture of (2 T soy sauce + 1 T balsamic vinegar), salt, pepper, some cayenne, fresh herbs (we had parsley). We found feta to be a nice addition as well. Also good with brown rice. Pretty much any root veggies would do well in this way of preparing, which I found in my CSA cookbook. Note to veggie lovers out there: CSA cookbooks are great, if you can get your hands on them.
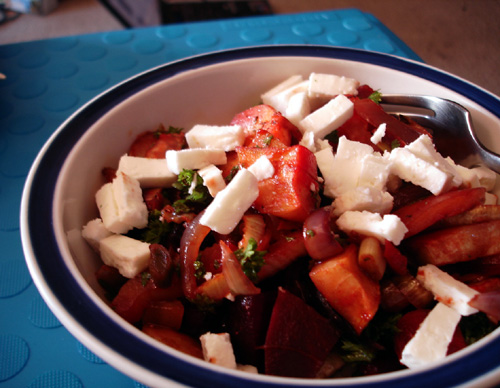
roasted-root-vegetables

Here’s to Spring and all of the adventures it brings.
Read Full Post »

Starting my new job today (!!!), so a quick post full of quick vegan noms.

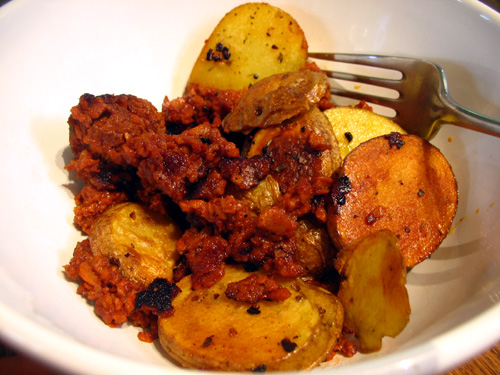
Fast and easy vegan breakfast, take 3-ish:

How to: Fry up some potatoes in olive oil. After flipping (once brown on one side), add soyrizo. Fry a little more. Nom. Swoon.

Quick vegan dinner in October:

Souuuuuup. Minestrone soup. Ok, ready? Set?
– Pan. Olive oil. Onions + garlic. Saute (no burning!) until slightly wiggly.
– Add carrots, celery, potatoes, other harder veggies of your choosing. Saute a little more.
– Add pasta, chopped kale/cabbage, small can of crushed tomatoes (with liquid), veggie stock to more than cover. Also add salt, pepper, Italian seasoning. Simmer for a while — until pasta is cooked.
– Again, nom.

Easy like… something that’s really easy, like… slipping on a banana peel. Or, considering I’ve never done that, someting easier. Like sleeping in on the weekend. Only tastier.

Read Full Post »

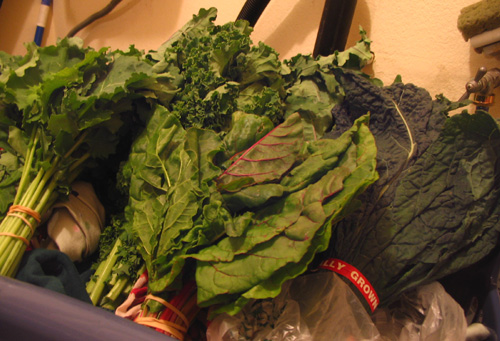
I’m drowning in greens. No, seriously.

I might be keeping them in my laundry room. There's no more room in the fridge!

I might be keeping them in my laundry room. There's no more room in the fridge!

I came home with a LOT of greens from the farmers’ market. I already had some beet greens and one bunch of golden chard (I couldn’t resist, and it was one dollar). Then at the market on Saturday I bought two bunches of kale (russian and some other kind) and two bunches of rainbow chard, all from a vendor who has the smallest most tender greens. But then my partner in crime at the stand told me to see another farmer down the way for greens as the market was closing. He gave me six bunches of greens — four kale (one curly, two lactino, one russian purple), and two rainbow chard. That’s a total of ten bunches of greens.

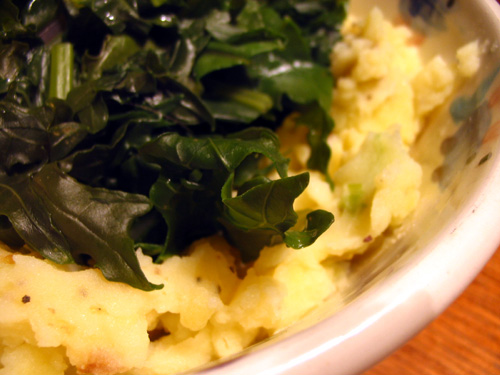
Naturally, I’m looking for a way to get through them. Some of the daintier chard became a breakfasty thing yesterday morning. One beautiful bundle of the smaller-leafed kale was destined last night for colcannon. Colcannon, I learned today, is a traditional Irish dish (some say the traditional Irish dish), meant for serving on Halloween. How appropriate! It is made with a combination of potatoes, onion or leeks, and cabbage or kale. Differing sources will tell you that cabbage or kale are the more correct green. Considering that kale is a relative of cabbage, I say it’s all good.

Here’s how I made colcannon — a delicious, healthy comfort food.

You need:
– Potatoes (I used one big one and four little ones), chopped into 1″ cubes
– One medium leek, cut into 1/2″ pieces
– One bunch kale, stems trimmed and cut into 1″ strips
– Milk of your choice, 1/2 – 1 cup
– Margarine or butter-like substance of your choice
– Salt and pepper

Start by boiling the potatoes in salted water. These take the longest. Then move on to the leeks (wash well!), which are sauteed in olive oil on medium heat until soft. The kale gets cooked (see how to cook kale) — do this last, as greens get cool very quickly and only take 5-7 minutes.

Once potatoes are fork-pierceable, drain water and transfer to bowl. Add leeks and 1/2 – 1 cup of milk. Mash. I like some chunks in there (and I leave the potato skins on anyway). Season liberally with salt and pepper. Create a crater, into which you put the (drained) kale. Top with a pat of butter-like substance. Curl up and carb out.

This is dirt-cheap and takes under an hour. Making kale tonight illustrated to me what a difference good produce makes in meal preparation — the kale I got was made of very young leaves, which cooked quickly and were tender and not bitter at all. If you’re looking for how to cook kale to make it taste good and so that it isn’t bitter, get ye to a farmers’ market! Get good kale! Your efforts will be rewarded.

Also, a reminder of why we wash our vegetables:

Go forth and celebrate the coming of Halloween with some colcannon!

Read Full Post »

The farmstand this week brought some winter squash. You can imagine my excitement! I’ve decided this is the winter I learn to prepare winter squash, so I snatched some of these babies up. First on the chopping block: delicata squash.

First of all, if you’re looking for economical food, winter squash has got to be it. This one weighed a little over a pound, and at $1/lb right now, that means that a good amount of food for two people was about $1.50 total, plus tiny amounts of sugar and stuff. Of course, one can’t live on squash alone, but I might try…

Squash friend needed seeds removed. Cutting winter squash can be a challenge. Get out your biggest sharpest knife and proceed cautiously. After much thinking, I figured out the best and safest way to cut the elusive squash. First I cut in half the circle way (so now two half as long pieces).

Then I cut the squash lengthwise, giving me four pieces that were open and half as long as the original squash.

Then I grabbed a trusty spoon with a sturdy handle to scoop out the seeds. I’ve done this with less sturdy spoons. They bent. As you can see from the above picture, the membrane inside the squash is not as moist as that inside a pumpkin — the seeds are also more compact in the drier insides.

And save those seeds! You’re going to use them.

I cut the squash into 1″ wide or so half-moons. After doing that, I got on to what ended up being my favorite part of the meal: caramelizing the seeds. I melted 1 Tbsp of margarine in a pan and put the seeds in on low-ish heat. Move them around constantly so they don’t stick or get burnt! After 2-3 minutes, add 1/2 Tbsp of brown sugar. Keep ’em moving for about 5 minutes or until brownish and caramelized. So good.

After the seeds have been removed from the pan and set aside for later, the squash goes into the pan, gets drizzled with olive oil, salt and pepper. Then 1/2 cup of water goes into the pan. Cover, and let cook for 15+ minutes or until you can stab quite easily with a fork. The texture will be really smooth and soft. Watch them at the end — the bottoms of mine got a little overdone, I think partially from the leftover sugar in the pan.

Remove to a plate and cover with seeds.

Yummers! I love that the shape of the squash is retained — and delicata is the only winter squash whose skin is edible, so you get that lovely color too. This was way more delicious than I expected. The seeds were sweet and toasty, and the squash had a really smooth texture and wonderful flavor, all by itself. I ate mine quite happily.

This was the right amount of squash for two people. You could, of course, make it for more by using more squash! This recipe came from my UCSC CSA cookbook — I feel like it was such a simple way of making it that it’s okay to reproduce here.

And hey, I also made some totally non-vegan Snickerdoodles from a family recipe. I’m pretty proud of how they turned out, but I guess that’s what happens with a good recipe!

Read Full Post »

Last night, I had a date. A date with an eggplant.

Eggplant and I have had a touch-and-go relationship. Well, actually, there’s never been much touching. Maybe a one-night stand at my favorite Sri Lankan restaurant where they actually know how to prepare eggplant. Usually, though, my relationship with eggplant consists of me finding it in mediocre grilled vegetable sandwiches that are the only thing on the menu I can eat. The eggplant is always squishy.

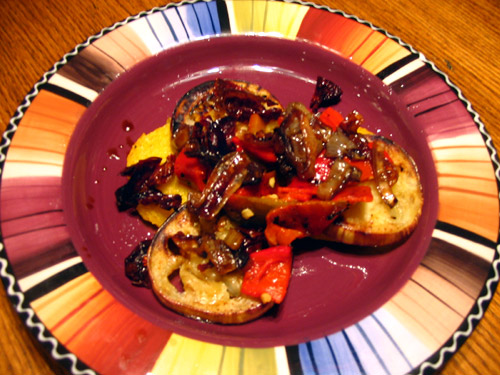
So I tried last night to make amends with eggplant and cook something delicious. Here was my game plan: fried polenta, broiled eggplant, sun-dried tomatoes, roasted Anaheim pepper, balsamic onions. Pretty much everything I read recommended some combination of eggplant-tomato-pepper. Makes sense, as they’re all in season around the same time.

By the way, did you know eggplant is a berry? And in the same family as tomatoes? Never woulda guessed.

Anyway, the players:
– Balsamic onions: Slice an onion (I used red) into rings and saute over medium-low heat in olive oil until translucent and wiggly. Move to a bowl and cover in balsamic vinegar. Allow to steep until you’re ready to use them.
– Roasted pepper: I roasted my Anaheim pepper directly over the stove flame. I’m not sure I like setting things kind-of on fire in my kitchen. However, it worked well.

– Sun-dried tomatoes: Reconstituted in olive oil, which I then used to brush on the eggplant.
– Eggplant: Sliced into 1/2″ circles and salted for quite a while — an hour? more? Broiled for 5-ish minutes each side as in this recipe.
– Polenta: Pre-made polenta roll (will try to make my own soon), sliced into 1/2″ circles and pan-fried in olive oil.

The results?

Really good! The polenta had a little bit of a crust and lent a sweetness to the dish’s foundation. The eggplant was not squishy and had remarkable flavor — I think I’ll peel it next time, as the skins got a little tough. The tomatoes were just a little tangy and chewy, providing a nice complement to the roasted pepper. The balsamic onions, though, were what really tied the dish together, picking up on the tanginess of the tomatoes while making the polenta and eggplant more interesting.

I am so making this again. I really surprised myself!

Read Full Post »

Friends, colleagues, fellow vegetarians and vegans alike,

Do you struggle with tofu? Do you feel as though you’re one of those infomercial people in black-and-white, wrestling with preparing tofu? Have you gotten your hopes up for a broiled, steamed, fried, or baked tofu recipe, hoping this could be “the one,” only to be met with disappointing results?

Well, join me in the color part of the infomercial. I think I have figured out how to make tofu perfectly, every time.

I’m going to walk you through the steps. No monthly payments.

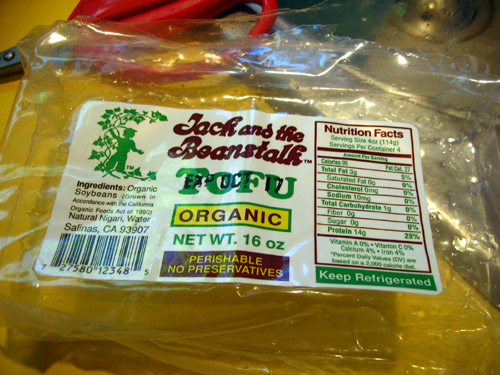
1. Procure some tofu for yourself. I used this:

I’ve found that tofu that comes with minimal water is usually the tofu that has the best texture. Tofus that come in plastic containers seem to hold more water. Obviously, you want extra firm or firm tofu.

2. Cut your tofu into 1/4 – 1/2″ slices.

This will give you a high surface area to volume ratio (crucial for flavor absorption and crispiness), but also give you tofu that, in the end, is good for anything.

3. Freeze your tofu for a few hours! This helps to really firm up the texture and give it a very chicken-like texture — I like a sturdy tofu. This is a departure from how I was taught to make this tofu, and I think it’s an improvement.

4. Thaw your tofu.

5. Marinate your tofu.

Marinade recipe: juice of 1 lemon PLUS 2 – 3 Tbsp of soy sauce, PLUS a little water if you don’t have enough for your tofu to soak up. You could add minced garlic to this, or red pepper flakes.
Let this sit for at least an hour, turning regularly to make sure it is evenly coated. You should see that your tofu is getting darker, because it is soaking up the marinade.

6. Dredging time! Put some (1/2 c?) nutritional yeast into a container a little bigger than your tofu slices, add a piece of tofu, shake to coat, flip, repeat until all the surfaces of the tofu are covered in yeast. The nutritional yeast will soak up some of the moisture, so you may have to flip a few times.

7. Frying time. Heat a frying pan, with enough oil to coat, over medium-ish heat (depends how hot your burner is). Fry each piece until golden-brown, about 3 minutes. Flip. Repeat.

Hooray! Tasty tofu with a bit of a crust. Should keep at least a week — probably way longer — in the fridge.

Ideas for using:
– eat with your hands
– use on a sandwich
– slice up in salads (I did this last night and I think it’d be good in a “chicken” Caesar)
– add to a rice bowl for some extra flavor and protein
– substitute for breakfast “sausage”
– eat with ketchup and a little hot sauce instead of “chicken” nuggets
– make “chicken” parmesan

Go forth and make tofu! I’m looking forward to cooking amazing tofu from here on out…

Read Full Post »

My dad recently asked for some instructions on how to cook kale. I’d showed him before, but he needed a written step-by-step.  I figured I’d share this how-to! A lot of this is informed by Greens Glorious Greens, which is the best cookbook (as far as I’m concerned) if you want to get eating some photosynthetic goodness.

Kale is a great source of all kinds of good things for vegans and meat-eaters alike. It’s full of calcium — more than a glass of milk! I love making some to throw into a bowl with some brown rice, miso-tahini sauce, and tofu.

Without further ado, I present you with a wordy post on:

HOW TO MAKE KALE!

1. Buy kale. Go for local and organic (it’s available almost year-round at any farmers’ market). Get whatever looks happy to you! I like the curlier sorts with red/purple stalks because they’re pretty and the curliness gives it a little more texture. However, it may be more difficult to get every little last bug out. I figure that possibly accidentally eating a few aphids is better than for sure eating a lot of pesticides. Of course, you must:

2. Bring your kale home. Store wrapped in a paper towel in a bag in the crisper drawer. I’ve had kale stay good for at least two weeks. When it’s K-Day:

3. Wash your kale. I fill my sink with some cold water and put all the kale leaves in. Kale and other greens cook down a LOT so one bunch is actually not too much for two people. I sometimes eat a whole bunch all by myself. If there are a lot of aphids (they can be greyish), put a little salt in the water. They should fall right off. Swish around, pull them out, and dry.
– This is a good time to start boiling water. Get out a wide pan with a lid and put 1/2″ – 1″ of water in it (about 1-2 cups). Any less than that and it may burn; any more and you may pull out too many nutrients. As it boils:

4. Cut your kale. I go for 1/2″ to 1″ wide strips. I don’t take the rib out but I do trim the stalk at the bottom. Some people don’t like ribs. I really don’t find them an issue. I will sometimes cut the leaves in half along the rib if they’re big leaves. I guess taking the rib out would inevitably cut it into half anyway… Bring the kale to the stove and:

5. Cook your kale*. Put the kale into the now-boiling water and cover. It will take about 5-7 minutes to get the kale the way you want it. Check every few minutes and give it a teeny stir to make sure nothing’s sticking. If you like the flavor and texture, turn off the heat and:

6. Drain your kale. BUT!! The liquid the kale cooked in holds a lot of the nutrients — in the pot likker/liquor. I put a colander over a wide bowl and use that to drain the kale. Let the water coot and drink it later; take the kale out and:

7. Make your kale delicious. It really only needs salt and maybe some lemon juice and pepper. Maybe toasted sesame seeds? It will take well to anything kind of acidic (red wine vinegar will also be good).

Now go make some kale! A cup of cooked kale has more calcium than a glass of milk… and adding the lemon juice adds Vitamin C, which helps your body absorb the calcium, and if you drink the pot liquor… you’re in great shape.

*There’s a lot out there on the internets that will tell you to saute your kale, or maybe suggest you add citrust to it when it cooks. Don’t believe it! It won’t go all radioactive on you, but it will make your kale ugly. Leafy greens have acids in them which, when released by cooking, turn them a boring brownish-green color; adding your own acid will have the same effect. By boil/steaming in water, you’re reducing the concentration of these acids in the kale, while simultaneously diluting the flavor compounds in the kale that make it taste bitter. Hooray cooking science!

Read Full Post »

Ugh. It appears that a weekend of traveling and one drink too many has left me sick. What’s a girl to do?
I have been playing this game all day in bed. Go doggy, go! Gotta say, it’s a good way to amuse myself.

But on the food front:

I’m whipping out one of my favorite vegan cookbooks, How It All Vegan. This cookbook, Garden of Vegan and La Dolce Vegan are my go-to cookbooks and have been with me since high school. They’re well-loved, with oil stains, pages falling out, writing all over my favorite recipes.

When I’m sick, I always get myself some kombucha and mix it with pomegranate juice and nurse the mixture all day. I figure there are enough antioxidants in there to give my body what it needs to fight the ickies. I’m also a fan of, early in the getting-sick process, mincing some garlic and putting it in a spoon, then covering that with honey and swallowing everything. It sounds weird but it is a good way to get raw garlic without killing your stomach.

So I’m whipping up a batch of Jana’s Winter Sicky Soup, which appears in How It All Vegan. I’m hoping it does the trick.

Ingredients:

1/2 medium butternut squash, peeled & cubed
4 medium carrots, sliced
1/2-1 c burdock roots, sliced
1/2 dandelion ROOT (I almost got leaves), chopped
2 tbsp olive oil
1/2 medium white onion, chopped
4 tbsp fresh ginger, grated
8 cloves fresh garlic, chopped
8 c vegetable stock or water
1 tsp cayenne pepper
1 tsp curry powder
pinch of salt
2 tbsp fresh rosemary, chopped
3 lemon slices
4 whole leaves of collard greens, roughly chopped
1/4 c miso
1/4 c green onions, chopped (garnish)

In large soup pot, saute the squash, carrots, and burdock and dandelion roots in oil on medium-high heat for 5-10 minutes or until ingredients are tender. Add the onions, ginger, and garlic and cook 5 minutes more. Pour in the stock and add the cayenne, curry, salt, rosemary, lemon, and collard greens and simmer on medium-low head for 40 minutes. Remove from heat, stir in miso*, and let stand 5 minutes before serving. Garnish with green onions. Makes 4-6 servings.

*Miso should never be boiled, as it will destroy all the good stuff in it.

Read Full Post »

I introduce to you, the food that powered me through college:

There’s a reason my breakfast today is arranged in a heart shape: I love this quick, simple, healthy, vegan! breakfast. It requires little hands-on time — perfect for rushing out the door to an 8am class — and is sturdy enough to sit in your stomach until there’s time to get a real meal.

Preparation is simple. Toasted bread (I used sourdough), plus some margarine. I use Earth Balance because it is trans-fat free and the best for any kind of vegan cooking/baking. Once the margarine has melted, sprinkle nutritional yeast on top. The yeast will soak up the moisture from the margarine, and that’s when you add MORE.

The result? A cheesy delicious meal on the go. Please note that it’s really good on bagels. This would also make a good accompaniment to soup, especially if you were to add garlic bread spices.

Hooray Vegan MoFo!

Read Full Post »

I just found out today from For the Love of Guava about Vegan MoFo, a blog movement from The Post-Punk Kitchen — the same kids that brought you Veganomicon. This is my most recent vegan cookbook purchase, and a regular in my kitchen, so hell yes I’m in!

The idea is simple: one blog post every weekday for the month of October about vegan food. I’ve been getting back to my vegan roots lately and limiting the amount of dairy I include in my food, in an effort to eat more grains, tofu, vegetables… and not frustrate my digestive system.

So here’s to delicious vegan food! I can’t wait. I retroactively tagged my yummy tofu recipe as Vegan MoFo, since it is totally vegan and incredibly delicious. And in October!

Today’s (vegan!) dinner: Sarah-riffic Fried Tofu, brown rice, miso-tahini sauce (a Veganomicon recipe), kale, and avocado.

Read Full Post »

Older Posts »